To know everything (or almost) about irises
1. Cultivation of Irises
Reproduction
There are two completely different ways to reproduce irises depending on the desired goal:
Try to obtain irises identical to the mother plant.
The simplest way and which does not require any human intervention since on the rhizome that we have and which has flowered (so we are assured of the conformity of the variety) lateral shoots will develop. These shoots will be adult in one year and can then be detached from the mother plant and replanted. It is asexual reproduction that makes it possible to obtain perfect clones.

This rhizome, which flowered last summer and which will no longer flower, has developed new irises identical to it. In this case, there are 14 of them (it can be more, but often less…).
Seek to obtain new cultivars.
This is “assisted” procreation.
The new irises are the result of creation programs by hybridization and require external intervention: either an anarchic and uncontrolled hybridization, which is the one that leaves room for pollinating insects, or a human and programmed hybridization (the one that interests us).
The hybridizer uses tweezers or a small brush and will take the pollen from the father’s anther then place it on the lip of the mother’s stigma. He places a label under the mother flower mentioning the title of the cross (mother X father) for subsequent traceability. If the crossing is successful, the ovary will begin to swell a week later and then transform into a pod. This, two months later, will turn brown and split to let out the seeds which our hybridizer will have taken care to recover at the first signs of cracking of the pod.
The seeds will be sown in suitable containers in the fall. The following spring young irises will grow. They will be replanted in the ground in summer. It will then be necessary to wait two or even three years before they flower and several years before deciding whether they are worthy of registration or not.
Planting
Soil.
Iris requires well-drained soil, preferably on mounds; if the soil is heavy, it is advisable to incorporate humus to lighten it, or even lime.

In case of heavy rainfall, the mounds allow the iris roots to be out of water.
Where ? How ? When ?
Choose a location that is well exposed to the sun, for at least half the day. In the shade, the iris will flower little, if at all.
The irises will be replanted with the tops of the rhizomes exposed and the roots well buried. Pack and water copiously at planting and then every week until recovery, approximately one month to 6 weeks later.
Depending on the category, the irises will be 25 to 40 cm apart. Planting them too closely means splitting more frequently than normal.
July, August and September are generally the months chosen to replant irises with a delayed tolerance for warm climate regions, the main thing being that they are well established before the cold weather. If you cannot plant your irises upon receipt (the ideal of course!), either you place them in sand, or you put them in a dry and ventilated place, but above all do not place them in water to hydrate them: they can stay dry for months without problem, whereas water will cause them to rot quickly.
Watering
Irises need humidity for recovery. However, as with most plants, copious, deep and spaced watering will be much more beneficial than repetitive meager watering which risks encouraging rotting of the rhizomes.
In case of prolonged drought in summer, copious watering once a month is recommended.
Fertilization
Watering It is wise to apply a complete fertilizer with a low nitrogen titer, type 6-10-10, because the excess nitrogen will promote strong development of foliage to the detriment of flowering. Roasted horn, bone meal, superphosphates are also effective.
Two annual applications are sufficient: the first at the very beginning of spring and the second one month after flowering.
Maintenance
Weeds, debris, dead leaves… so many enemies to the good health of your irises that you will have to fight against.
It’s up to you to choose between manual or chemical weeding, everything will also depend on the surface area you devote to your irises and the time you have available.
Do not let debris accumulate at the feet of your irises. The rhizomes will no longer be exposed to the sun and will suffer.
Break the floral stems short after flowering: this is an unnecessary expenditure of energy for the plant and will also avoid keeping pods resulting from untimely hybridizations. Cut off browned, stained or damaged foliage.
To avoid foliage spots (heterosporiosis), apply a fungicide from mid-March every 3 weeks until the end of May. These spots are unsightly, but do not compromise the health of the iris.
To avoid rhizome rot, avoid untimely watering, planting too deep, waterlogged and non-draining soils and soils invaded by anything that prevents them from enjoying the sun. If an iris is affected, pull it out, generously cut the rotten part to get to the healthy part, sprinkle it with cinnamon and let it dry for several days in full sun before replanting it in a pot in a very sandy mixture where you will be able to monitor it.
Fight against soil insects with appropriate treatment: wireworms are fond of our irises which do not like them at all and can be destroyed by these parasites.
Division
Your iris plants have become huge, the rhizomes are overlapping… Don’t wait until they stop flowering! Divide them every 3 to 5 years, in summer, by tearing up the entire clump and keeping only the largest rhizomes which are located around the edge of the clump. Prune the foliage and replant them immediately, following the planting and watering advice.
In short, take care of your irises which are not really demanding and they will return it to you a hundredfold by illuminating your garden and subtly scenting your evenings!
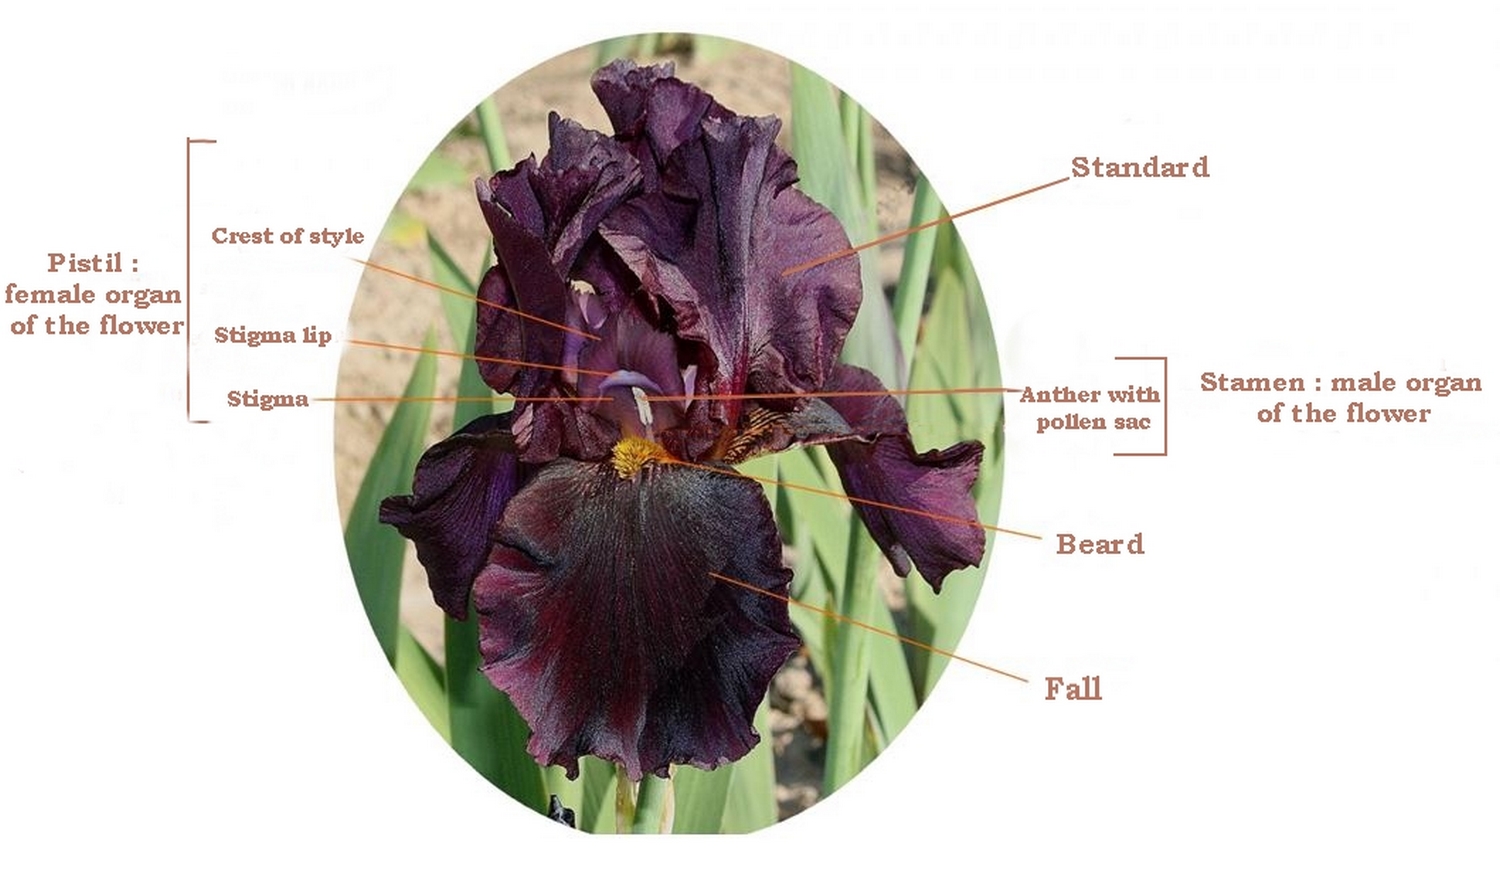
A little morphology…
2. Classification of Bearded Iris
Depending on the distribution of colors on the iris flower, these will be classified in different categories. I will take you on an illustrated tour of these different classifications which will allow you to better understand these designations.
3. PBF Iris
So-called PBF irises have purple foliage at the base (Purple Based Foliage).

These irises represent 7% of my collection. Apart from the aesthetic side which is not negligible, they are also a valuable aid in the identification of certain irises.
Take the case, for example, of ‘Codicil’:

and ‘Sacrée Barbouze’ :

It can be tricky to identify an iris and say that it is one variety or the other. But we have a major advantage, since ‘Codicil’ is a PBF and ‘Sacrée Barbouze’ is not. So, this different foliage can avoid an identification error.
4. The winners
It is tradition in the USA to award medals to irises in each category. This race for honors takes place over several years and judges from the American Iris Society award awards and medals.
The highest distinction is the Dykes Medal which is awarded to only one iris per year. Only irises that have already passed other competitions can qualify for this competition. It is unfortunate that only American irises can participate in this competition… for now!
Here is a publication from the AIS : The American Dykes Memorial Medal.